
In this guide, we will see how to configure and run InfluxDB, with some brief explanations and minor edits to its configuration
- Download InfluxDB
- Configure and Run InfluxDB
- Run InfluxDB as a Service
Download InfluxDB
InfluxDB can be downloaded from the InfluxData website at the following link: https://portal.influxdata.com/downloads/
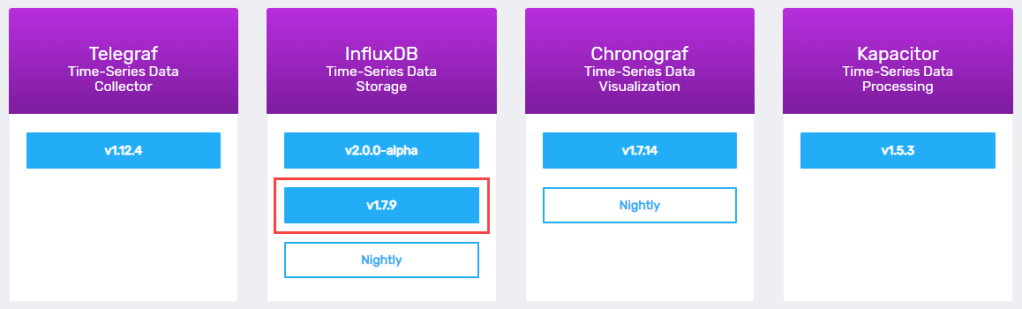
In this guide, I will use InfluxDB version 1.7.9 which is the current stable version.
After downloading the zipped windows binaries, extract them in a folder, I will call it “influxdb”. The folder should contain the following files:
influxdb
    │   influx.exe
    │   influxd.exe
    │   influxdb.conf
    │   influx_inspect.exe
    │   influx_stress.exe
    │   influx_tsm.exe
Configure and Run InfluxDB
InfluxDB can be run by executing “influxd.exe”, but first we need to prepare a configuration file and/or set environment variables.
In this guide I won’t use environment variables, more info can be found in the docs.
There should be a file called “influxdb.conf” which contains all the available configuration options with their respective explanations, the documentation can also be found on github.
The same conf file can be generated from the executable without the comments using the following PowerShell command
#output the default conf to the console
.\influxd.exe config

#output the default conf and write it to a file
.\influxd.exe config > influxdb_custom.conf
run the second command and open the created file “influxdb_custom.conf” that should look like the one below (the configuration uses the TOML synthax)
reporting-disabled = false
bind-address = "127.0.0.1:8088"

[meta]
  dir = "C:\\Users\\gluisotto\\.influxdb\\meta"
  retention-autocreate = true
  logging-enabled = true

[data]
  dir = "C:\\Users\\gluisotto\\.influxdb\\data"
  index-version = "inmem"
  wal-dir = "C:\\Users\\gluisotto\\.influxdb\\wal"
  wal-fsync-delay = "0s"
  validate-keys = false
  query-log-enabled = true
  cache-max-memory-size = 1073741824
  cache-snapshot-memory-size = 26214400
  cache-snapshot-write-cold-duration = "10m0s"
  compact-full-write-cold-duration = "4h0m0s"
  {...and a lot more...}
We won’t change a lot of settings, but there are few things that I want to point out about the default configuration here
- Files Location – InfluxDB will create all his files and folders in the user directory, in the “.influxdb” hidden folder
- Logging – The log is sent to stdout and not written to a file
- Authentication – Authentication is disabled
1- Define the Files Location
The first step is to decide where to put our database data, I will create the following folder tree in the same path of the InfluxDB executables
influxdb_files
├───data
├───log
├───meta
└───wal
If you are lazy you can use the following PowerShell commands to create those folders
#set the path in which influxdb are going to be stored
$InfluxPath = <absolute path to influx folder OR Get-Location for the current folder>
$RootFolderName = "influxdb_files"

#[void](<command>) casts the result of the command to void datatype, suppressing its output message
[void](New-Item -ItemType "directory" -Path $InfluxPath -Name $RootFolderName)
[void](New-Item -ItemType "directory" -Path $InfluxPath\$RootFolderName -Name "data")
[void](New-Item -ItemType "directory" -Path $InfluxPath\$RootFolderName -Name "meta")
[void](New-Item -ItemType "directory" -Path $InfluxPath\$RootFolderName -Name "wal")
[void](New-Item -ItemType "directory" -Path $InfluxPath\$RootFolderName -Name "log")

#list directories
dir $InfluxPath\$RootFolderName
then change the following configuration keys and make them point the new folders (mind the double backslash in the path)
[meta]
  dir = "C:\\Projects\\monitoring_sample\\influxdb\\influxdb_files\\meta"

[data]
  dir = "C:\\Projects\\monitoring_sample\\influxdb\\influxdb_files\\data"
  wal-dir = "C:\\Projects\\monitoring_sample\\influxdb\\influxdb_files\\wal"
2- Define Logging Settings
When it comes down to logging influx does not offer a lot of parameters , most of the configuration is down to the settings below
[meta]
  logging-enabled = true

[logging]
  format = "auto"
  level = "info"
  suppress-logo = false

[http]
  log-enabled = true
  access-log-path = ""
  access-log-status-filters = []
  suppress-write-log = false
  write-tracing = false
As you may have noticed the generated default file is missing a key in the [http] section, “access-log-status-filters”, which must be manually added to the configuration.
Below only the edited log settings
[logging]
  format = "logfmt"
  level = "warn"
  suppress-logo = true

[http]
  access-log-path = "C:\\Projects\\monitoring_sample\\influxdb\\influxdb_files\\log\\influxdb_http.log"
  access-log-status-filters = ["4xx", "5xx"]
With those settings, we achieve two different things
- Logging – The log sent to stdout will contain only warnings and errors, will not contain the logo and will be written in “logfmt” format, readable for humans and also machines (it is a single level key value pairs).
We still need to send this output to a file but we will see it later. - Http – The http activity will be logged to a specific file, but only if the request has received an error response (status 4xx and 5xx). This also prevent the logging of all the write request received by the database.
Check if the configuration file is valid by running InfluxDB with following PowerShell command (under logging you may want to set the key level = info before running the command in order to see some output if everything is ok)
.\influxd.exe -config .\influxdb_custom.confIf the configuration file is not valid you will receive an error (the output is still sent to the console).
3- Enable Authentication
This one is pretty easy, in fact we need to change only the following key
[http]
  auth-enabled = false
and set it to true
[http]
  auth-enabled = true
In practice, when we first connect to InfluxDB we won’t be able to do any action, except creating an admin user, after that we can log in and work as usual on the influx server.
Run InfluxDB
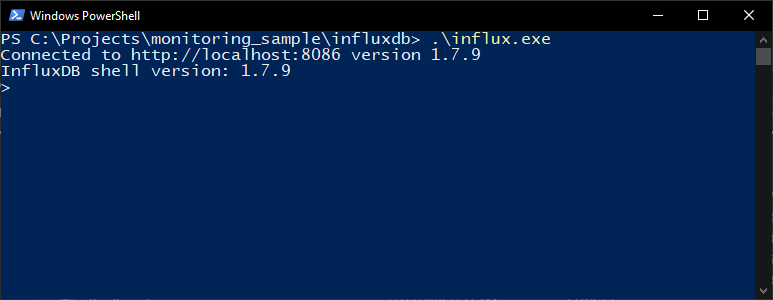
We can finally run InfluxDB, to do so start Powershell and execute the following command
.\influxd.exe -config .\influxdb_custom.confNow that InfluxDB is running we must connect to it, how?
By default it runs on port 8086, but it can be changed in the conf file
[http]
  bind-address = ":8086"
  #the format is {host:port} -> ":8086" means that Influx can be reached by any host on the network on port 8086
We can communicate with InfluxDB using http request but the easiest way is to use the executable “influx.exe”, so open a new PowerShell or cmd window and execute it.
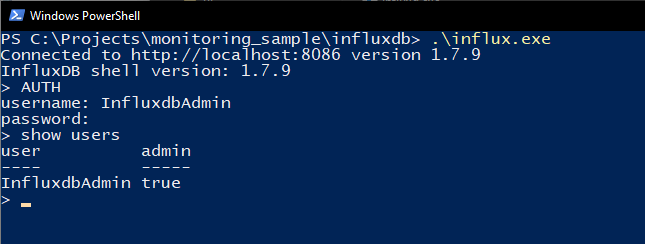
The first thing to do is create a admin user, any other command will return an error.
Execute the following commands to create and log in with the user
--create an admin user
CREATE USER InfluxdbAdmin WITH PASSWORD 'password' WITH ALL PRIVILEGES

--log in (this will ask for user and pw),
--to know if the AUTH has been successful execute another command
AUTH

--show users
SHOW USERS
For other log in methods have a look at the docs.
Run InfluxDB as a Service
You thought it was over, but not yet, the last step is to run InfluxDB as a Windows service.
To do so we will use another useful tool called “Non Sucking Service Manager” or “nssm”, so head to this page and download it.

from the downloaded zip get the “nssm.exe” executable, I will move it to the root folder of this sample project but it can be placed anywhere. (but consider that you might not be able to move it afterwards).
nssm.exe can be used from the terminal but also offers GUI, we will use the GUI, to open it you need to execute it from PowerShell or cmd (as admin), open a new PowerShell window (as admin) and run the following command
.\nssm.exe installThe below window will open, with several tabs to configure the service
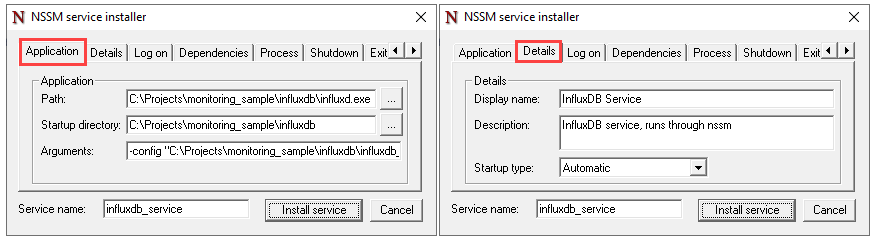
It is important to specify the absolute paths to the files, even in the arguments, not doing so may lead to errors.
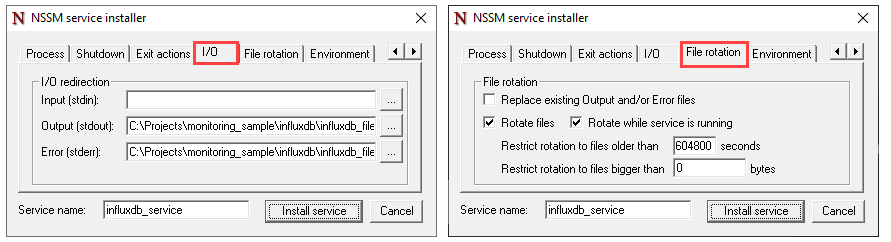
Do you remember that the InfluxDB log was sent to stdout?
The good news is that nssm is able to redirect that output to a file and also to rotate it, so you won’t have huge or useless log files.
The first step is to create the log file, you should already have a folder for for the logs, for me it is C:\Projects\monitoring_sample\influxdb\influxdb_files\log here i will create the file “influxdb_service.log”
The user that runs the service must have the permission to write the files, the user can be configured in the “Log On” tab, using a specific AD user will automatically give him the permission to log on as a service. I will let it run with the local system account.
In the nssm configuration set the following
After clicking “Install Service” you should see your new service in Windows
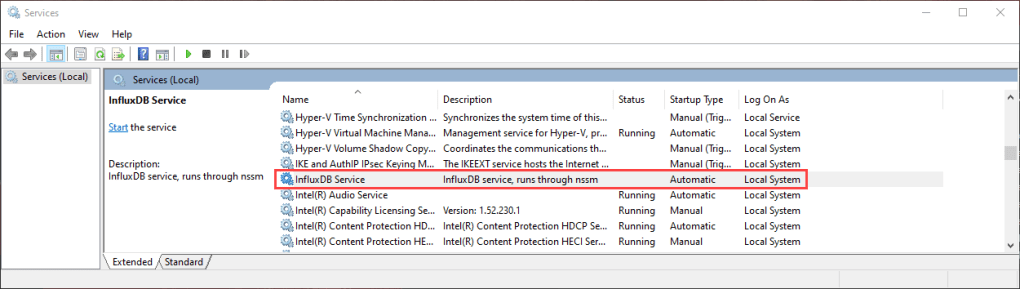
Start the InfluxDB service and then try to connect to InfluxDB (using influx.exe as you did previously).
In case of errors you can check your log files and the Windows Event Viewer (nssm writes to event viewer)
The End
That’s it, your InfluxDB instance should be up and running
I hope found this guide useful
